Believe it or not, we all must hook our Genesis’ and Mega Drives up to some sort of visual display device (ie: a TV or monitor) in order to play its games. Seems like crazy talk, but it’s true. It’s common knowledge that all displays are not created equal, and neither are the methods we use to get the video signal to that display. And there are quite a few different connection methods you can use! Back in the days of yore, game systems like the Atari 2600 and Intellivision had only one option: RF. And this was usually accomplished by twin leads that you screwed into where your rabbit ear antennas hooked up. You can still hook current game systems like the Xbox 360 up this way to this day, as long as you have a 75-300ohm (coaxial to twin lead) converter. But is that really the best option? Of course not! The Genesis can be made to output in several different manners, and we’ll explore each of them in this article and do our best to provide visual examples of the differences.
The different methods:
RF
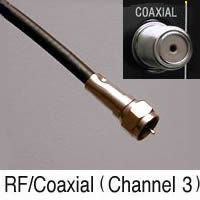 RF stands for “Radio Frequency” and is sometimes referred to as the “channel three hookup.” This is also called an RFU switch. This is definitely the worst way to have your system hooked up in terms of picture and sound quality. Back in the beginning days of the Genesis this was by far the most common way to hook the machine to the TV. The video quality is a single composite stream with the audio modulated in. Your TV thinks it is a broadcast of the Cosby Show and that is why you must “tune” your TV into that channel to play games. The RF picture quality is usually hindered by a fair amount of noise that you can see moving on the screen at times, and the picture may also appear to be a bit unstable, depending on the quality of your TV’s tuner. You are also limited to mono sound using this method. If you have a very early Genesis model 1, you will not hear any sounds generated from the left channel. Some instruments and sounds just won’t be there. For the Genesis model 2 (or others that use the same connection like the Nomad and CDX) if the Genesis end of the cable has two pins, you are only getting either the left or the right channel, if the cable has three pins, then you are getting all of the sounds, but it is still in mono. At least with the model 1 you can route the sound out of the front headphone jacks to a stereo and still enjoy good sound.
Composite
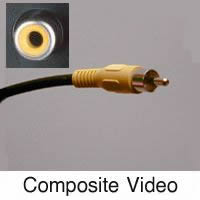 This is a step up above RF and is sometimes known as RCA or simply “Video.” Back when the Genesis was released in 1989, newer and slightly more expensive TVs had composite input jacks on them. The video signal was sent straight to the TV without being combined with the sound signal. The resulting picture looks very similar in resolution and color quality as RF but with a few worthy advantages such as the absence of noise and a much more stable picture. Color quality is usually a bit improved as well, though not too much. This is the most popular method to hook up the Genesis in this day and age since it is almost impossible to find a TV that doesn’t have a composite video input. Be sure to get a stereo cable if you have a Genesis 2 or higher, or use the headphone jack-to-stereo-system method if you have a Genesis 1. In fact if you have a Genesis 1 that’s the only thing you can ever do to get stereo sound without modding the system.
S-Video
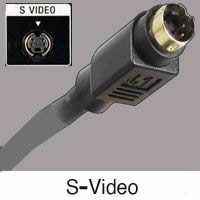 This is a substantial step up above composite. S-video works by keeping the luma (brightness or black and white) and the chroma (color information) separate instead of cramming everything into the same signal like composite does. The resulting picture will have noticeably more definition, especially in vertical lines. S-video was first introduced when Super VHS machines rolled off the line in early 1988. The Mega Drive was released in Japan in 1988, so it should come as no surprise that the machine did not natively support this new format which was very rare even on expensive TVs. However since native Genesis video is pure RGB, it’s not too much of a problem to get an S-video signal out of the machine either by physically modifying the unit or building/buying an external adaptor to do the job. S-video is very common on mid-to-low priced TVs these days, and a few years ago it was just as common as a composite input was back in 1992 or so.
Component Video
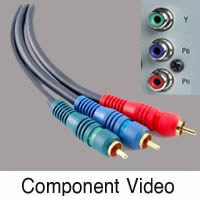 This is the cream of the crop nowadays. Don’t be fooled by the red, green and blue cables… component is not true RGB. But it is close. Component video cleans up the picture even more, especially the reds which still have a tendency to smear in S-video. Here’s how it works: The green cable (Y) contains the luminance, just like half of an S-video cable does. In fact, if you plug just the green wire in you’ll get a nice black and white picture, even if you plug it in to a standard composite jack on an ancient TV! The blue cable (Pb or B-Y) and red cable (Pr or R-Y), are just the differences between the luminance & blue and luminance & red, respectively. The color green is not transmitted. The display knows how bright things are, what is red and what is blue and figures out that the rest must be green. A Genesis can be modded for component output, but it is very expensive to do. I’d recommend building or buying an external solution if you want to go that route. The problem is that’s not going to be cheap either! The way I did it was to obtain an RGB SCART cable which comes out of my 32X and connects to an RGB to YUV (component) converter via the SCART connection. Standard component cables are then used to hook up to my TV. There are no means to get sound out of the RGB to YUV converter (without modifying it), so I just use the Genesis headphone jack like I always have and go straight to a stereo system. For this reason you will want to be very careful that you do not do this with a model 2 Genesis, since all sound is exported through the same output jack unless you have it modded for RCA stereo out. Amazingly there are more new TVs these days that feature component inputs than those with s-video inputs. This kind of upsets me as many of my other game systems use s-video connections, and I don’t want to downgrade them to composite.
What is SCART?
SCART is a special 21 pin connector used mainly in European countries which naturally stands for “Syndicat des Constructeurs d’Appareils Radiorécepteurs et Téléviseurs.” Yeah. Rolls right off the tongue. Simply put, it’s kind of a precursor to HDMI in that it can carry audio and video over the same cable which simplifies equipment hookups. It’s entirely analog, and it can carry signals for RGB, s-video, composite, stereo sound and more… all at once! If you live in a place where your TV has a SCART connector, check the operating instructions to see if it supports RGB. If it does, run out and get an RGB SCART cable for your Mega Drive RIGHT NOW and then be sure to post on the forums how lucky you are since the cables are pretty cheap. Be warned that not all SCART connections use the same pin configuration. Some may not support s-video, and some might, others may pass composite only. But the RGB part of it is fairly standard.
Show me the differences these connections make in picture quality! Now!
 OK OK! Below are pictures I took with a digital camera pointed at my TV while sitting on a tripod (my camera… I was standing). All pictures were taken with the same camera on the same TV with the same Genesis and were not Photoshopped in any way other than cropping and resizing. Please be aware that a digital camera “sees” a TV a little differently than the human eye does and that all types of images will generally look a bit better in real life than what is pictured here. Also, you may see some curved “bands of light” in the images. That is the result of my digital camera from 1998 and my TV not getting along. Those curved lines are not in the actual image.
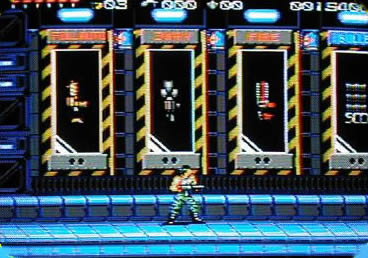
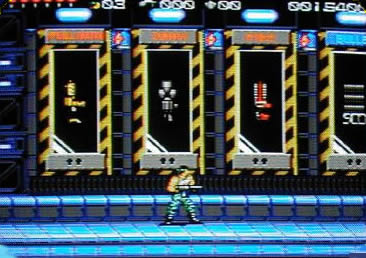
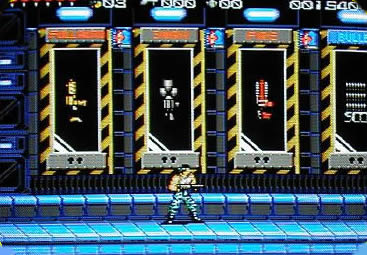
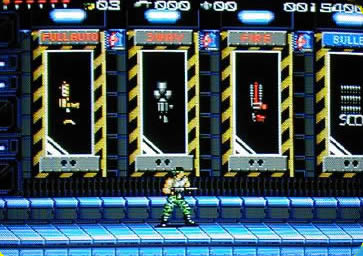
First we look at the weapons selection screen in Midnight Resistance, a game with 8 Mega Memory!
RF – Notice that everything seems a bit blurry and the colors are smeared. In fact it is very difficult to read any of the weapon names on top of the cases. I rate the RF connection 2 out of 8 Megas.
Composite – This looks pretty much the same as RF for the most part. What the picture doesn’t show is the lack of graininess due to RF noise and a picture that is more stable. I give the composite connection 3 out of 8 Megas.
S-video – Here we suddenly see a lot more definition, especially in the vertical areas like the ridges under the cases, and the bolts on the grey parts of the cases themselves. Everything seems to be a bit more “in focus,” and the text is a bit easier to read, especially the blue “BULLETS.” 6 out of 8 Megas.
Component – No more smearing, anywhere! All of the text is now completely readable and you can tell that his pants are definitely supposed to be green. Clearing up the reds, which is one third of the color spectrum really helps component look the best overall. 8 Mega Power!
Sure, Midnight Resistance may be one of the world’s most popular games ever, but I still want to see another comparison!
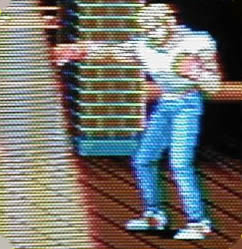
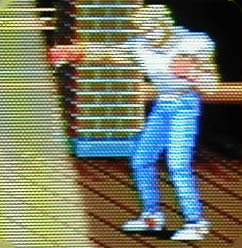
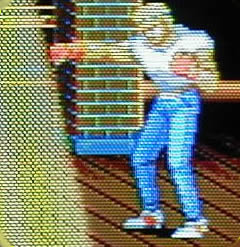
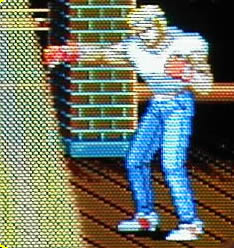
Alrighty, here’s a close-up from Streets of Rage 2:
RF – Fairly blurry and crappy. Notice on the spotlight how weird horizontal bands appear. The RF connection cannot handle the “dithered mesh” that composes the spotlight. You’ll notice some vertical color bands in the spotlight as well since the RF connection is crap.
Composite – Here we see that the color is improved a bit and now the spotlight almost appears as a true transparency. But when it scrolls or characters move behind it, it is still very clear that it is a mesh. Notice the weird curved band of color that starts at the top left of the spotlight and bends slightly to the right as it travels downward. This is the effect of my camera not getting along with my TV. This is not visible on the real connection unless you have a really cheap TV.
S-video – Now we can see the mesh of the spotlight for what it really is, and the overall picture looks much sharper. We can also make out the seam in Axel’s jeans as well as slightly bolder color.
Component – The color is more refined here, you can see the mesh and the seam in Axel’s jeans is very clear.
Great! But since component video is so close to RGB in concept, why doesn’t it look more like this grab from an emulator?
A couple of reasons. First and foremost: my camera sucks, my TV is an off-brand called “Advent” which is a sad little thing (I’m upgrading soon), I don’t know how to take perfect pictures from a TV screen and like I said before, the digital camera sees things like this differently than the human eye. The onscreen images look much better in real life for each example. Secondly is the way TVs work. The Genesis is running on an analog TV in 240p. Yes, that’s progressive scan on a regular analog TV. It does this in all connections and it doesn’t interlace ever (except for Sonic 2). This means that every other TV line is skipped during the scanning and that leaves some “blank space” visible between the lines when viewed on a real TV. This also means the TV image gets a small amount of free anti-aliasing. As for that emulator pic (which is pixel-doubled and therefore looks even blockier), I sure hope that’s not what pure Genesis video looks like. Look how awful those colors are! Things like this is why I’d rather play on a TV any day, though there are filters one can apply to emulators to fake the TV effect to a limited degree. If you play on an HDTV, the 240p will be treated as 480i in all cases. This can be displayed as 480p or higher depending on the TV. Because of this the Genesis and other systems of that era can in fact look a lot like the emulator picture, blockiness and all, when played on an HDTV.
So how can I get s-video out of my Genesis?
Well one option is to actually mod your system or have somebody mod it for you. Look around at Oldschool Gamer, as they have a good reputation and even warranty their work for ninety days! They can modify a model 1 or model 2 and I’m sure probably a model 3 as well (though it may be too cramped inside). They won’t do a CDX or a Nomad (and I’m guessing a Mega Jet is out of the question). Prices for the s-video mod start at around $65 USD or so, and that includes a full detail cleaning of your Genesis so you won’t have dust in the contours of your system as well as a general refurbishing.
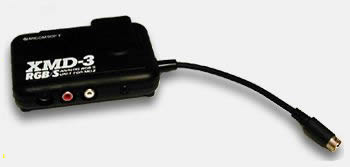
Another way is to buy an external converter which takes the pure RGB output from the Genesis and converts it to the s-video which you so desperately need. One such device is available in Japan is the XMD. It contains a Sony CXA1145P chip which will make the s-video for you. Simply hook it to your Genesis or Mega Drive , connect an S-video cable and off ya go! Unfortunately these can be pretty expensive, ranging from around $120 or so before shipping from Japan . There is a version for the Mega Drive model 1 and model 2. If you can find one without the box it will be much cheaper for some reason. The good news is that if you have a 32X, you can get the model 2 version and connect it to your 32X’s output and have all your Genesis, Sega CD and 32X games presented in s-video no matter if you have a model 1 or 2 Genesis! Another advantage is that it can also be made to work with any type of Genesis that outputs an RGB signal, even the Nomad. Search for “XMD mega” (without the quotes) on eBay if you’re willing to spend the bucks. I have heard mixed reviews on these units. Some work really well and others seem to have slight banding problems with the red. Modding may be your best bet in terms of price and overall quality if you don’t mind not being able to use the 32X in anything but composite. You can always purchase a Sony CXA1645M chip off of eBay or elsewhere and make your own converter for cheap that will work with the RGB output of the Genesis and/or 32X, but don’t look to me for schematics!
Component is obviously the best next to pure RGB. Should I strive for component?
Although it is better than S-video, you certainly don’t need component. With S-video you’ll still be enjoying much-improved video and you don’t have to worry about how you will get sound out of your Genesis to your TV or stereo (unless you have a model 1, then it is easy). Try to think of component as an extreme measure, and make absolutely sure you know what you are getting into if you decide to go that route. I don’t want to be responsible for people hooking up SCART RGB to Component YUV converters and then wondering where their sound is. S-video is great.
I can see the difference in the pictures, but I don’t really think it’s worth the expense or the trouble to get S-video or better out of my Genesis.
That’s fine. If it looks good to you, then nothing I say here can change that. There is nothing wrong with playing your Genesis in composite or even RF, but this article is mainly for those who are curious about what the differences are, how to get their system’s video capabilities upgraded, and to find out if it is worth it or not. If you figured that it is still not worth it, then more power to ya! Also it is worth noting that different TV sets vary in quality, obviously. As crazy as it may seem, composite video on a really good TV can look as good if not a bit better than s-video on a really bad TV. So only consider changes if you think your TV is decent to begin with.
What about the other peripherals that hook up to the Genesis like the Sega CD and 32X? Will they see an improvement as well?
You betcha. The Sega CD uses the Genesis’ video output, so any improvement you will make to your Genesis will benefit Sega CD games as well as Master System games when using a Power Base Converter or the like. Check out the pics below for some differences. As for the 32X, the way that works is it takes the Genesis video output as its input, combines it with new 32X video and outputs a new signal. So if you get your Genesis modded for S-video, you’ll still be stuck with composite for the 32X. But if you use an external method to make S-video or component from the RGB signal, then yes, the 32X can benefit as well.
Here we see a close-up of the first driving level of Batman Returns for the world famous Sega CD. Notice the windows in the scaling building on the right side of each picture. I am using component to best illustrate my points about connection methods, but S-video will yield a similar result.
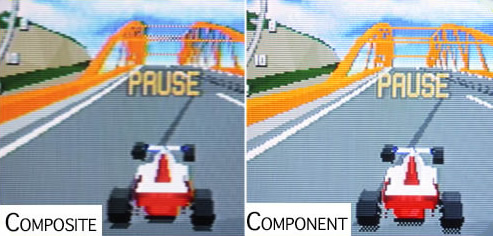
Here’s Virtua Racing Deluxe running on the critically acclaimed 32X. Some may like the composite better because it blends the dithered shadows better. Personally I prefer the component or S-video. This is probably not the best example, but it’s one of my favorite 32X games and it needs some lovin’.
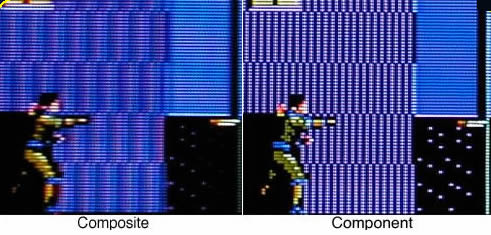
The Master System version of Shinobi played through the Power Base Converter. Wow. Big difference. For years and years every time I got up to this level, I wondered why the purple stripes on the building in the background scrolled with me as I walked. With the upgraded video, they no longer do and you can see the individual lines.
I still don’t understand, but I’ll pretend I do just for the sake of the article.
This is most likely because I am a lousy writer.



Recent Comments